How to Use Succulents to Make a Beautiful Fairy Garden for Your Yard
If this is your first time creating your own mini fairy garden, I think you’ll be pleasantly surprised at how easy and fun this craft is.
Using succulents makes fairy gardens even more low-maintenance so if you’re ready to add an added layer of intrigue and beauty to your home and yard with a DIY succulents fairy garden, then let’s get started!
Fairy gardens remind me of my childhood home; we had several of them throughout our front and back yard.
In fact, you couldn’t go more than a few feet without finding a strategically placed fairy garden, large gnome, or intricate garden sign.
If you want to learn how to make your own fairy garden, get your yard ready for an added layer of intrigue and beauty!
The best thing about making your own mini fairy garden is that you can customize it to your liking.
You can fill it with gnomes (my mom’s favorite!) fairy angels, animal figurines, and your favorite small plants.
As a succulents lover, I make my fairy gardens with small succulents of different colors, shapes, and textures.
Since succulents are hardy and adaptable, they’ll easily thrive in your fairy garden all year long and they’re easy to care for, too.
Plus, their compact size fits perfectly next to small figurines and miniature fairy houses.
Children love playing with fairy gardens, so making them together can be a fun family activity and an excellent way to squeeze in some inexpensive quality time.
I made the fairy garden below using succulents and terra-cotta pots of four different sizes. The trick to making it is to use height to your advantage.
By including three different levels, you’ll be able to add dimension and separate compartments to your garden craft.
Doing this also gives you the opportunity to use more of your gnomes, fairy angels, plants, and other fairy garden accessories. It’ll help to create more of a striking visual with less space!
(This post may contain affiliate links).

Once you finish making your fairy garden, you can either place it on the floor within your garden or set it on top of something such as a small chair, wooden barrel, or porch stairs.
Fairy Garden Accessories and Supplies
Technically speaking, a fairy garden is a miniature version of an actual garden. Fairy gardens include soil, small live plants, and miniature fairies and gnomes.
They give gardeners of all levels the chance to practice their gardening skills and tend to a garden year-round. They make perfect centerpieces for patio tables and can also be grown indoors or on apartment balconies.


Fairy gardens are completely customizable, but they generally require potting soil or cactus mix (if you’re using succulents), miniature gardening gnomes and fairy figurines, and at least one terra cotta pot or container that can hold soil.
Make sure the container you use has a drainage hole at the bottom, so that water can drain out of it when you water your garden; this will help keep your plants healthy and free from rot.
DIY Fairy Garden

To make your own DIY fairy garden, choose your pots or containers. For this fairy garden, I used a 10 inch terra cotta pot, one medium-sized terra cotta pot, one 4″ terra cotta pot, and two 2″ terra cotta pots.
Then, you’ll want to choose your plants. This is my favorite part!
For mine, I picked a few small succulents from my garden. To do the same, simply grab your pruning shears and snip off some cuttings from the succulents you have at home.
You can also purchase succulents in 2-inch pots online or at a garden center. (Learn how to care for succulents here).

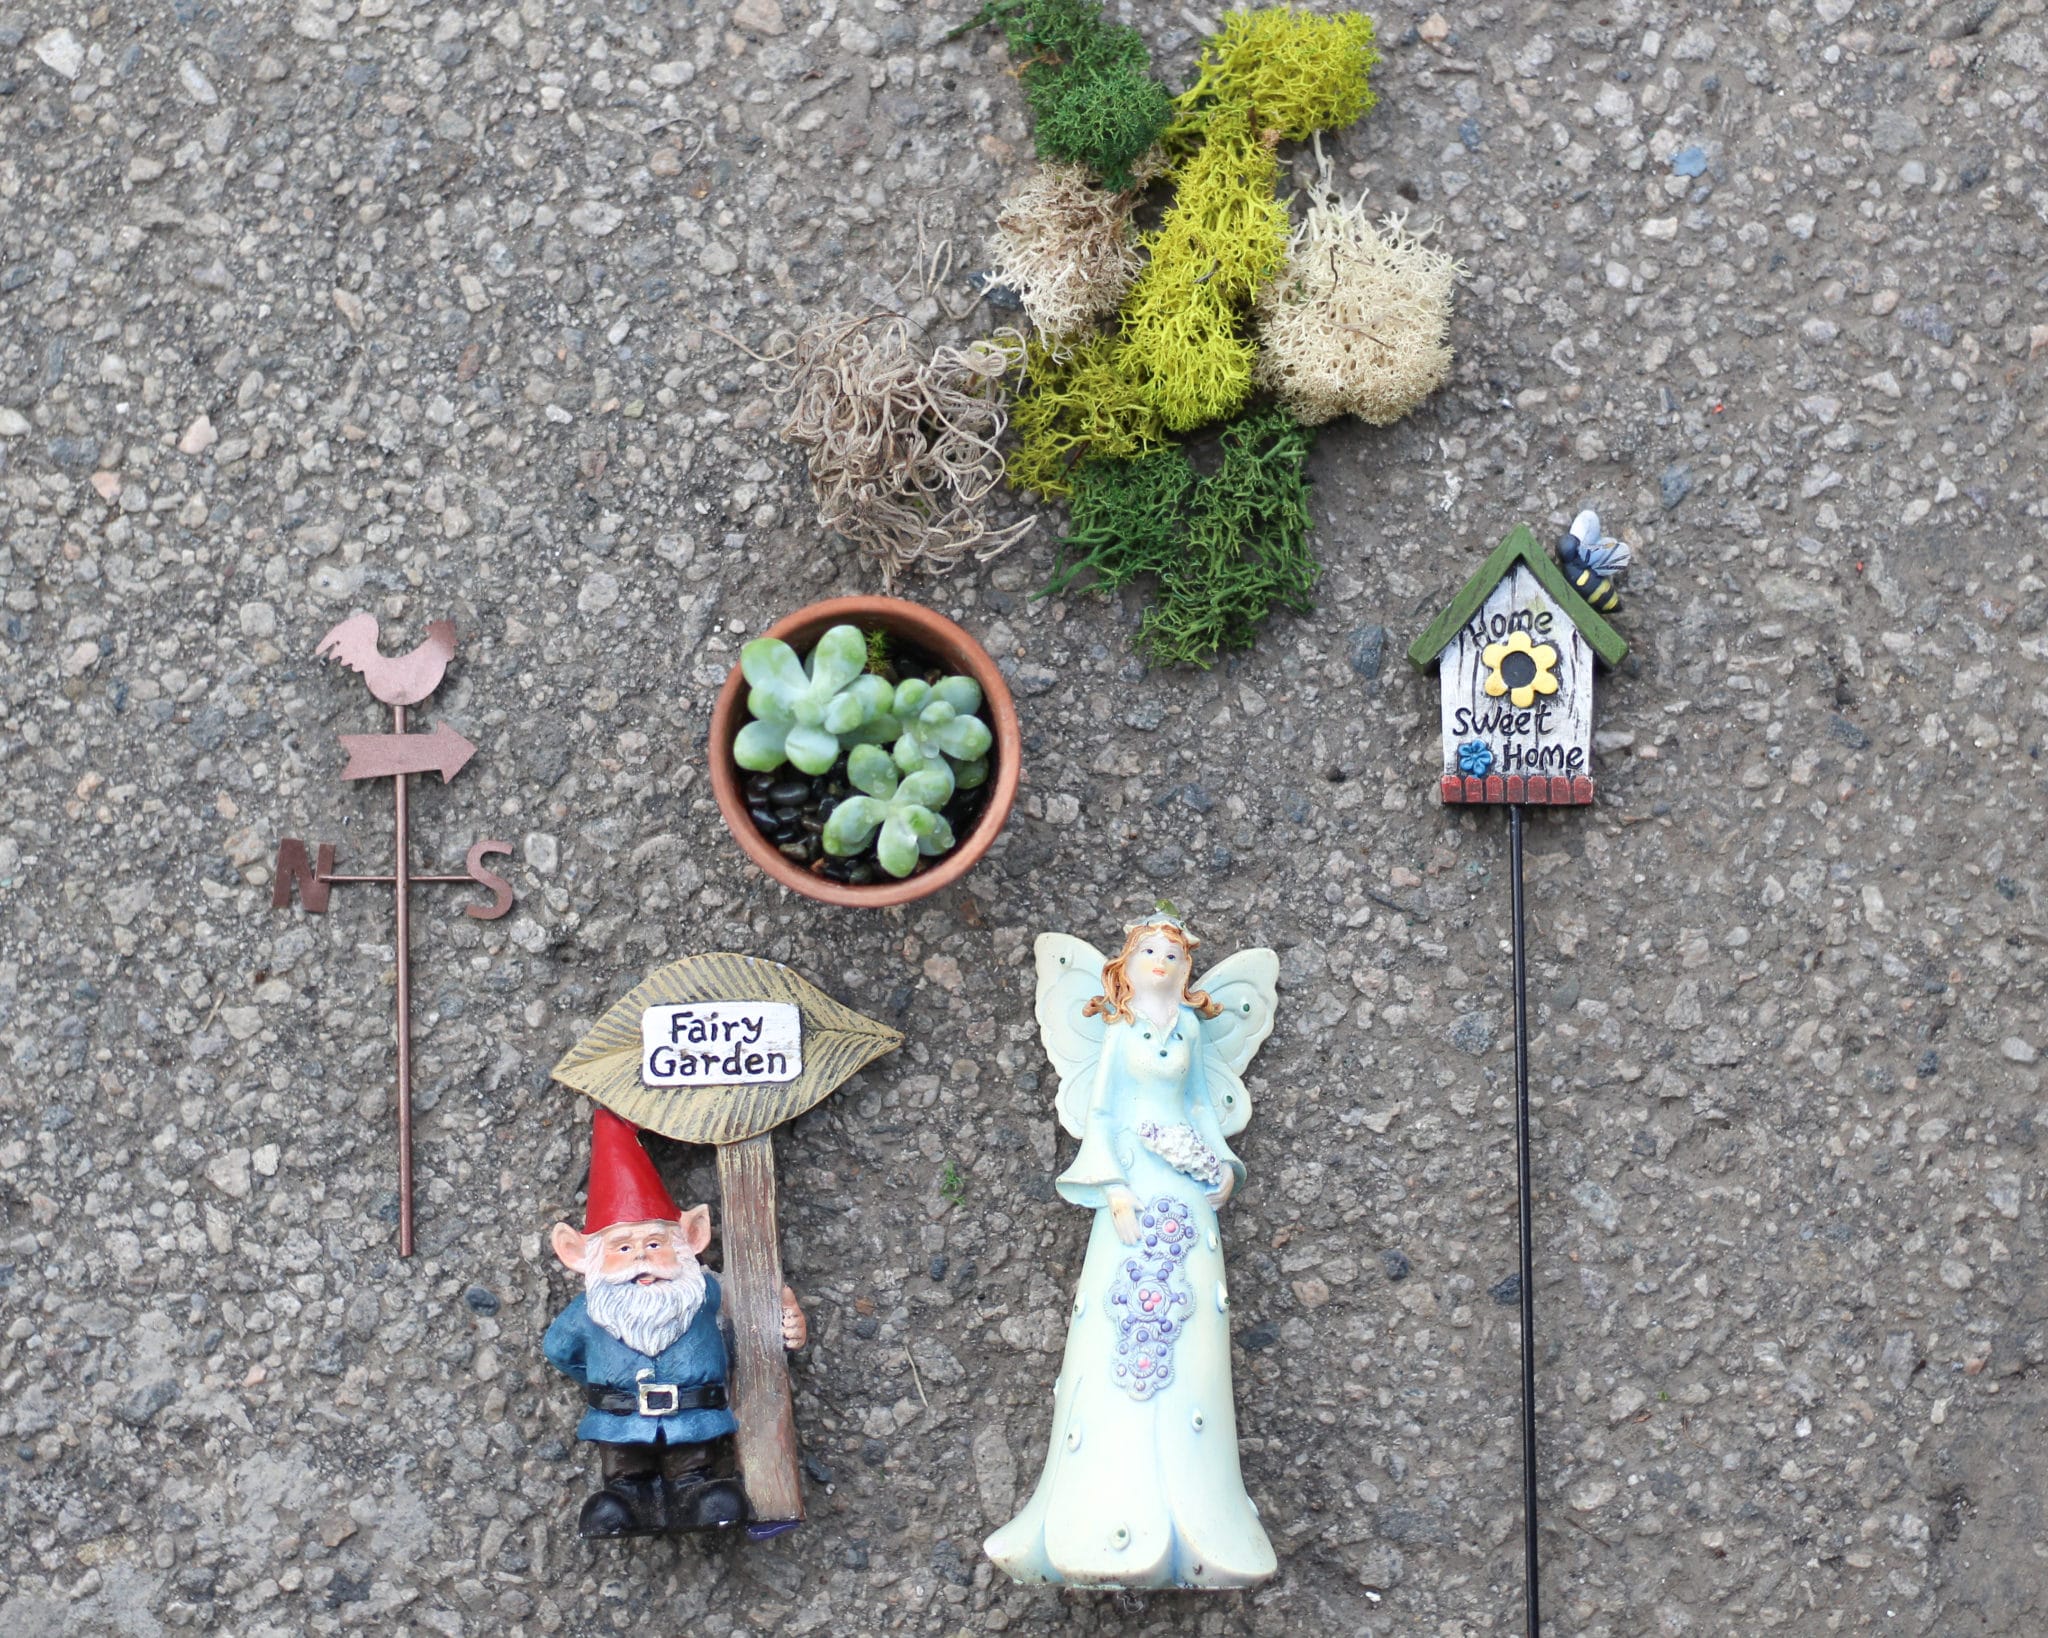
Next, gather any small figurines and accessories you’d like to add to your fairy garden. There are no rules here- so, have fun!
I utilized 2 miniature gnomes, one fairy angel, miniature mushrooms, two miniature ladders, a Home Sweet Home sign pick, miniature porcupines, Super Moss, a North and South sign pick.

If you don’t have anything on hand, you can find fairy garden accessories at stores like Michaels and Joann’s, or on Amazon.
Choose accessories that make you happy- anything miniature will do! Now let’s get into how to put together your fairy garden.
STEP ONE
Fill your largest pot or container with soil. Since the goal is for your fairy garden to have several layers, you’ll need to add more soil directly under your medium-sized terra-cotta pot so that it sits higher than the other pots.
So, one side of your large pot will have much more soil than the other side, as shown in the photo below.

STEP TWO
Fill your medium-sized pot with soil, then place some of your plants in the pot. For my medium-sized pot, I chose to add height by planting a taller succulent variety.
To add contrast, I paired it with two rosette-shaped Echevarria succulents. I think they look great together!
After planting, I covered the topsoil with small decorative rocks.
STEP THREE
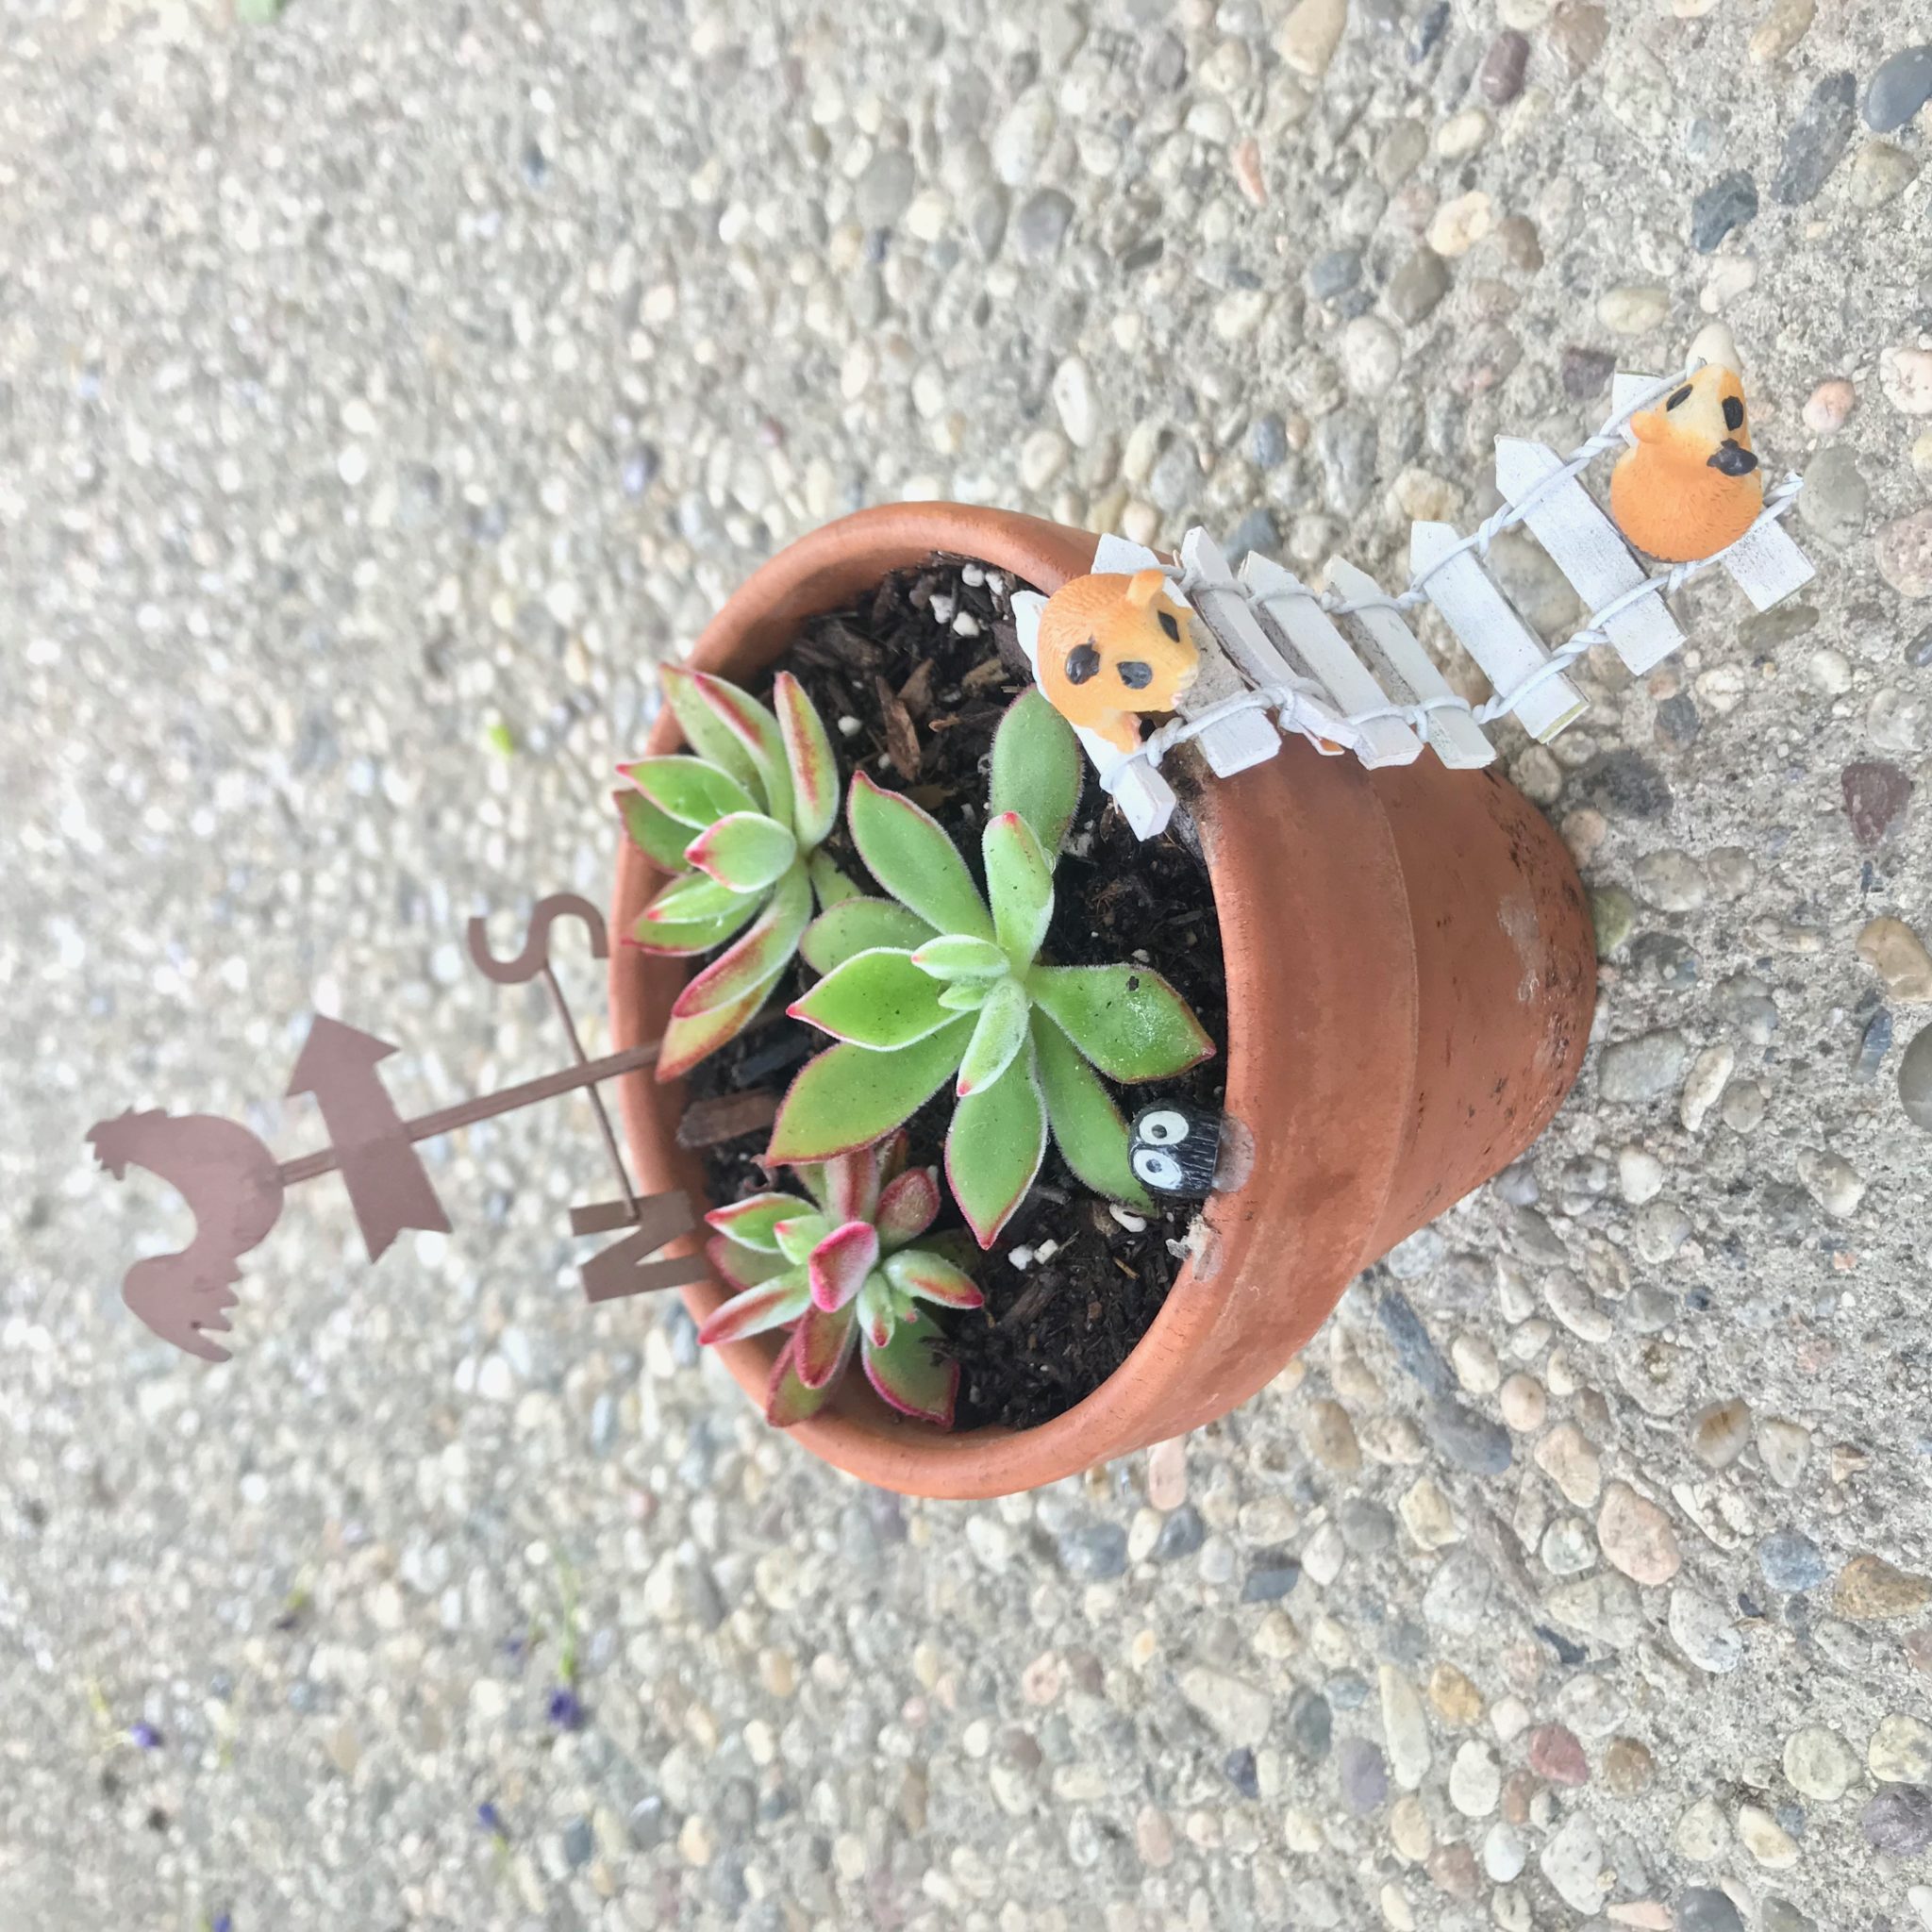
Now you need to arrange your next container. This container should be smaller than your medium pot but larger than your two-inch pots.
I filled this pot with three small succulent cuttings. This particular succulent is so unique because it actually feels like felt, plus the leaves are outlined with a red-burgundy color!
The color combination adds another layer of depth to the fairy garden.
After planting your chosen succulents or plants, cover the soil with decorative rocks, and place the pot into the larger pot and in front or beside the medium-sized pot.
Feel free to glue a few accessories to the rim of this pot, using Krazy glue. You can see in the photo below that I glued on a miniature ladder and two little squirrels (or are they mice? I’m not exactly sure!).
I also stuck a North/South pick into the soil. TIP: You can add your accessories when you finish planting your entire fairy garden.
STEP FOUR
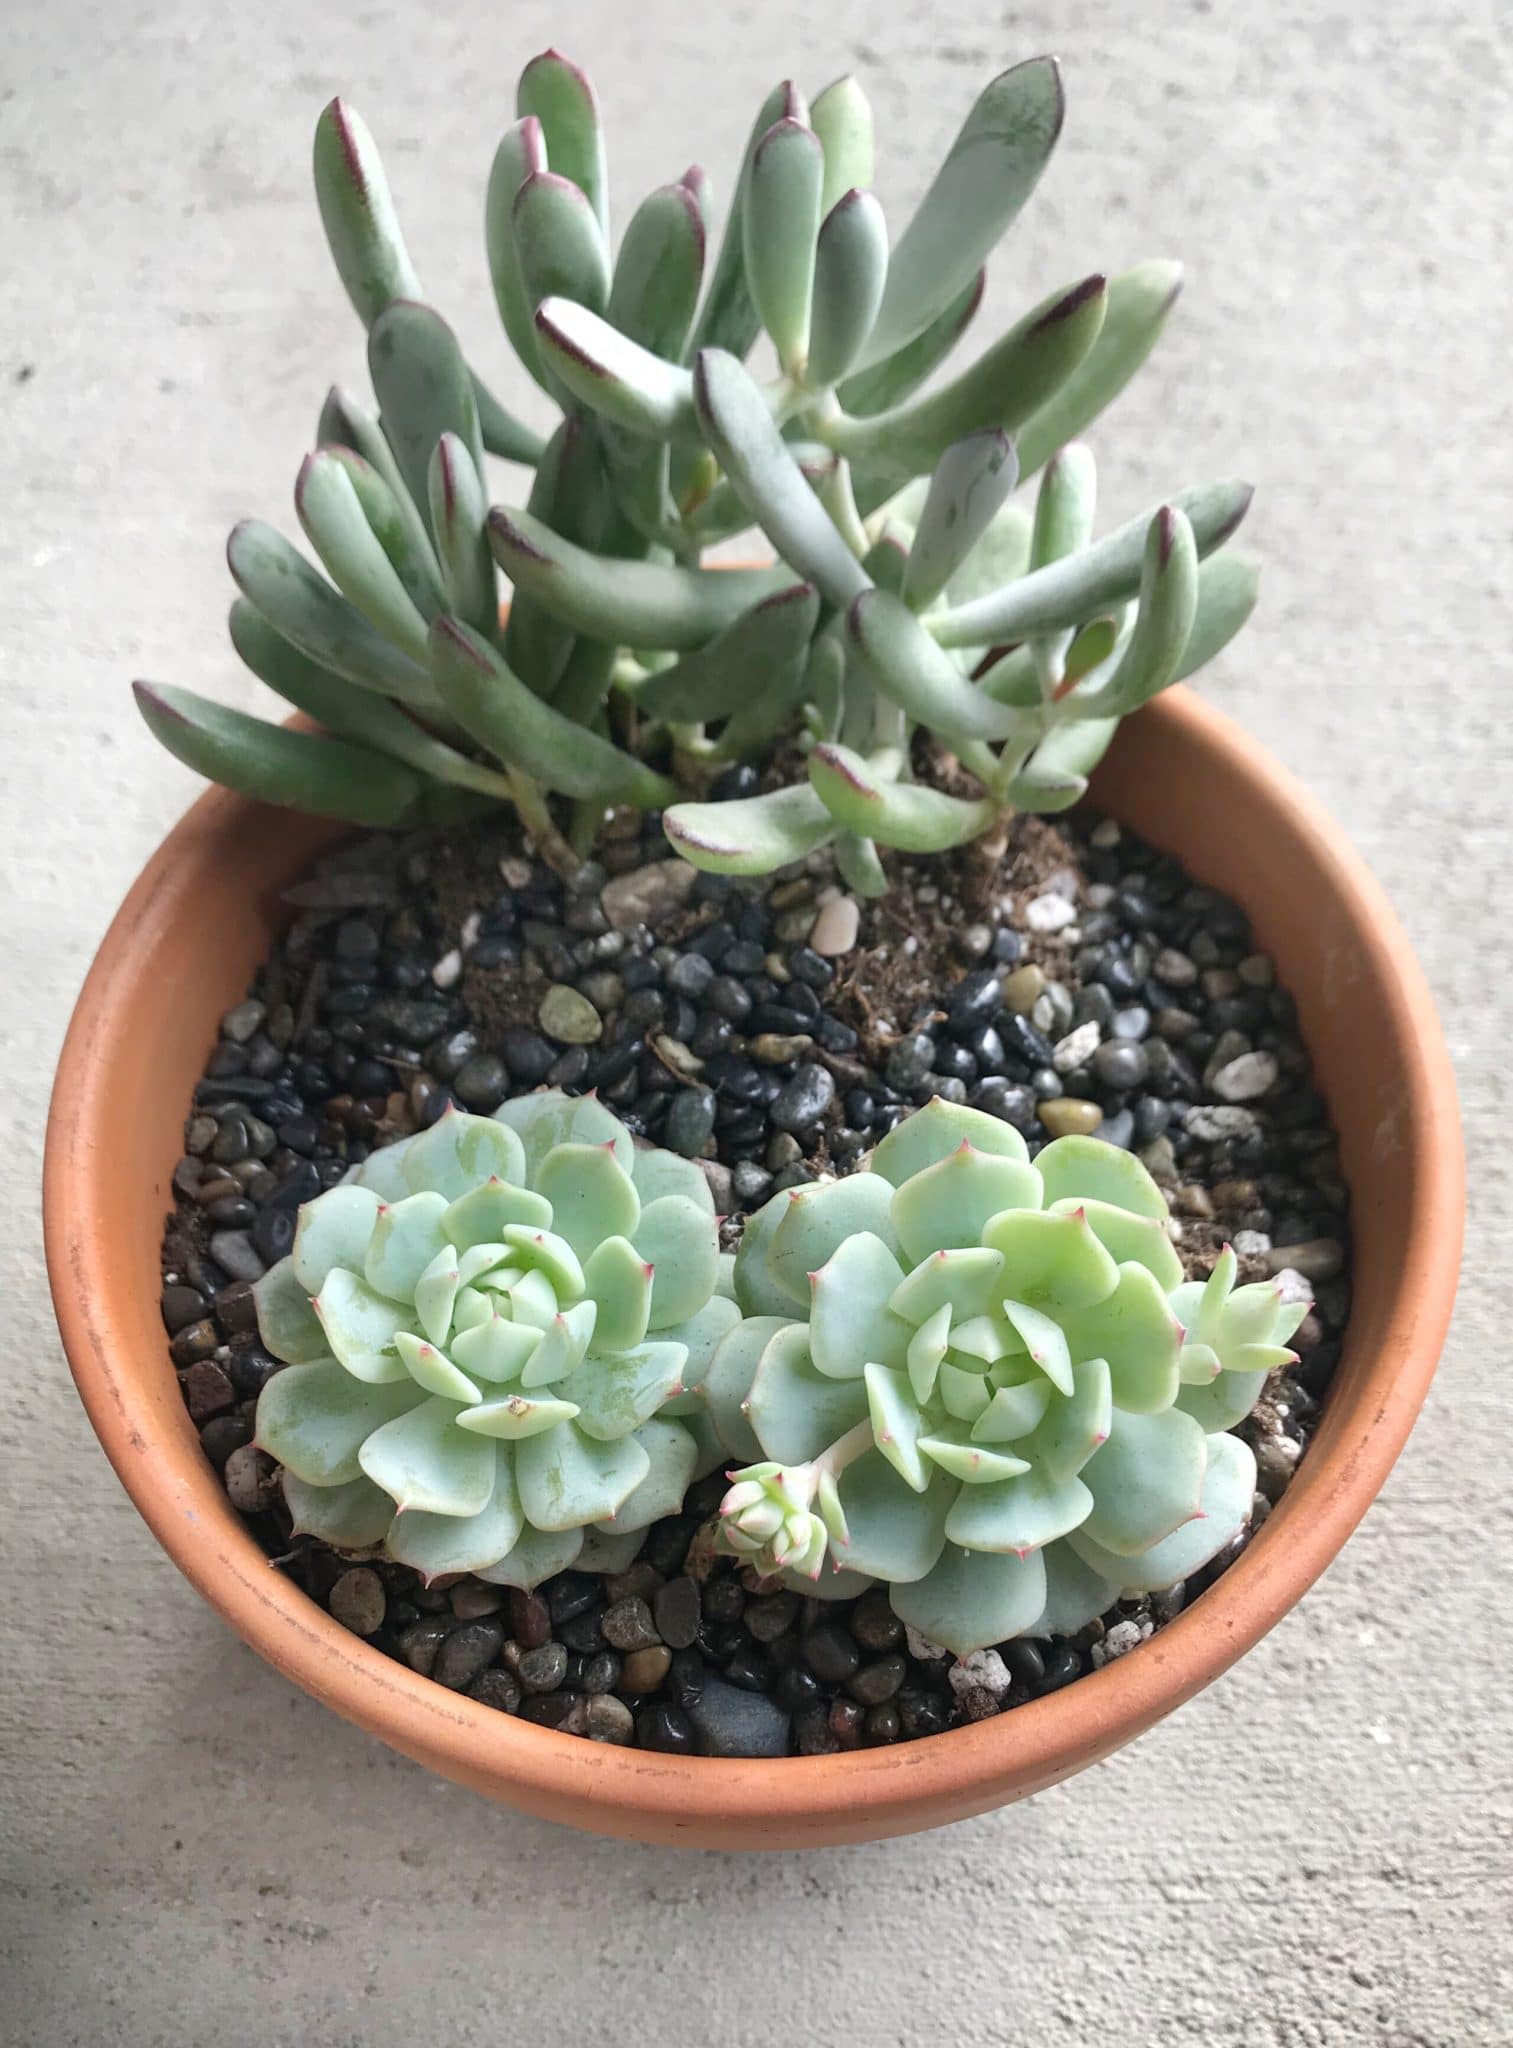
Finally, it’s time to arrange your two 2” inch pots! Choose tiny plants for these, they’ll look cuter than plants with larger leaves.
For mine, I used a few cuttings from my Sedum Clavatum and Echevarria Lola plants.
When you’re done planting the succulents, cover the soil with decorative rocks.

STEP FIVE
This is the step where you’ll put it all together! By this step, you should have all of your pots inside the largest pot, as shown in the photo below.
Remember, you want to add different heights to your pots, so make sure you have the appropriate amount of soil under each pot so they all sit at different heights.
The tallest pot should always have more soil beneath it, while the shortest pot should always have less.
STEP SIX
After you arrange your pots the way you like them, it’s time to cover the soil and fill in any bare spaces with Super Moss !
I recommend using moss because it will add texture and pops of color to your fairy garden, so place it generously in spots where you think it will look good.
Since the super moss shown below consists of different colors, it’ll really help to spruce up your fairy garden.
The different shades of green will pop and make it look like a garden out in the wild! I used my moss as a top dressing to cover the soil in the largest terra-cotta pot.

STEP SEVEN
Now it’s time to strategically place your accessories. Carefully add the fairy garden accessories to both the inside of your pots and to the rim of your pots, too.
I placed my mini gnome and fairy angel inside one of my pots, and I used Krazy glue to attach my larger gnome to the rim of the largest terra cotta pot.
I did it this way because I thought the fairy angel would complement the taller succulents I planted.
Then, I placed miniature mushrooms and animals within the pots and beside the other plants.
I use Krazy glue again to attach the mushrooms, porcupines, miniature ladders and the little animals to the terra cotta pot.
Adding a miniature ladder to the pot makes it look like your fairy garden is its own special far-away land!

STEP EIGHT
Now that you’ve learned how to make a fairy garden, it’s time to pick the perfect place for it in your yard!
I like placing my fairy gardens on top of something interesting, such as this green garden chair.
The 10-inch terra-cotta pot nests into it perfectly! This chair can be moved anywhere in the yard, and since it’s green, it’ll complement the other plants within the yard.

How to Care for a Fairy Garden
Just as with any other plant you own, you need to care for your fairy garden, or it’ll die. Since fairy gardens are so small, taking care of it should be a breeze!
Since I used succulents in my fairy garden, I won’t be watering too often, every few days to once a week is sufficient.
Succulents store water in their leaves and stems, so overwatering them will cause them to rot. It’s why using pots with a drainage hole is so important.
When you’re ready to water your fairy garden, use a small watering can or a watering squeeze bottle to allocate just enough water to moisten the soil.
Try not to water on top of your fairy garden accessories or the actual plants themselves. The key to keeping a fairy garden neat and tidy is keeping everything in place, including the soil!
Soil-covered gnomes and garden fairies might make your fairy garden less visually appealing, so be mindful.
After all, these miniature figures are the stars of your fairy garden! (Visit this post if you need more help with how to water succulents.)

Besides watering your fairy garden, you’ll want to carefully consider the spot you choose for it. While plants do need sun, full sun during long summer days can scorch your tiny plants, even if you use succulents.
Part-shade is best for fairy gardens, so think of a spot in your yard that gets shelter from the sun for a few hours a day- perhaps you have a large tree or a shrub you can place it near or an area on your porch that gets shade in the afternoon?
Remember, fairy gardens are customizable so create one that suits your taste!
Choose accessories that you love and plants that you enjoy growing. Fairy gardens present the opportunity to care for and nurture something and it should also bring you joy.
For more garden crafts that are easy to make, visit the posts below:
A Beautiful DIY Succulent Centerpiece
DIY Christmas Ornaments with Live Succulents
Best Full Sun Succulents for a Beautiful Outdoor Garden
The Best Succulent Plants for Indoors
DIY Succulent Arrangements: Fun and Easy Ideas for Your Home
Why are My Succulent Leaves Shriveling?
Do Succulents Die After Flowering?
How to Make a Fairy Garden Using Succulents
How to Water Succulents
How to Care for a Jade Plant
How to Fertilize Succulents
How to Get Rid of Mealybugs on Succulents
What’s Wrong with My Succulent?