How to Fix Mistakes in Your Bullet Journal
(This post may contain affiliate links).
Making mistakes in your bullet journal can be so frustrating, especially if your goal is to create an eye-catching spread.
It’s hard not to expect perfection from yourself when you hop onto Pinterest and Instagram and see a host of flawless bullet journal layouts on display- it can be quite envy-inducing!
Looking at these spreads is an excellent way to get inspiration for your own bujo creations, but you shouldn’t allow yourself to be too intimidated by them.
Afterall, if you’re not artistically inclined, it’s hard to expect your monthly, weekly or daily spreads to look like the images you see online.
And there’s nothing wrong with a simple spread – the bullet journal system is meant to be customizable and unique to every person, which means that your spreads don’t have to look like those created by other bullet journalists.
What works for me may not necessarily work for you, and vice versa. You have to find a middle ground between creativity and practicality.
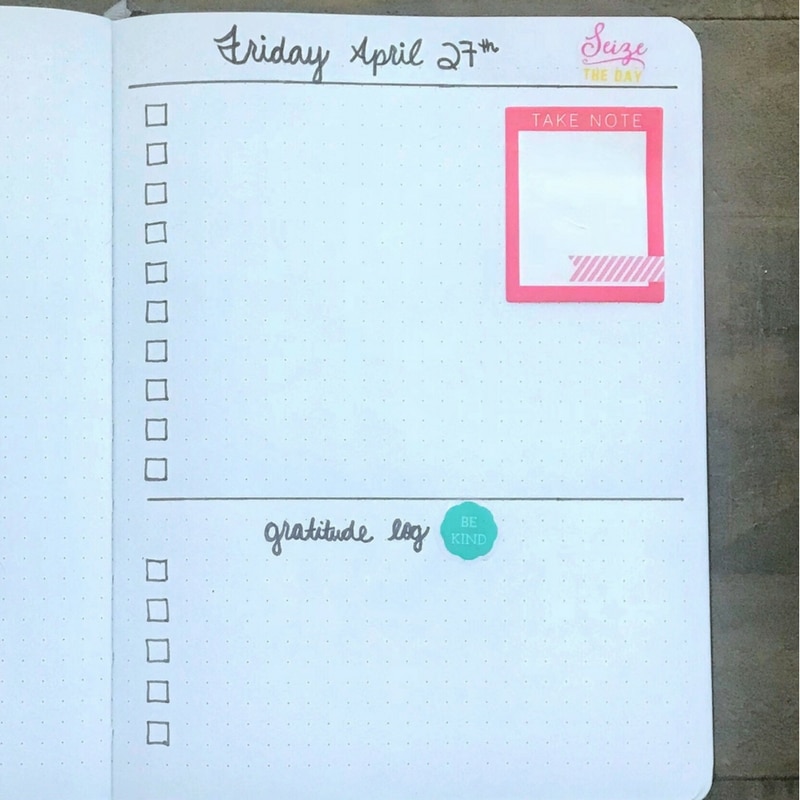
For instance, take a look at this daily spread I created. Does it look awe-inspiring to you? Probably not. It’s a very simple, easy-to-do layout because I’m not an expert drawer and I’m a bit of a minimalist.
I don’t compare myself to others, I just gather inspiration from them and then I create a layout that meets my organizational needs.
*This daily spread includes a gratitude log, which is something I use every day and encourage you to try. (It helps you focus on the positive things in your life).
While mistakes are inevitable, no one likes ruining a valuable page in their journal.
Bullet journal notebooks can be pricey, so wasting a perfectly good page and taking up space with an ill-timed mistake can be pretty disappointing.
In fact, I was hesitant to write in my bullet journal when I first purchased my Leuchtturm1917 ![]() for this very reason. This notebook
for this very reason. This notebook![]() is so pretty and the paper quality is so excellent that I didn’t want to compromise it with my clumsiness.
is so pretty and the paper quality is so excellent that I didn’t want to compromise it with my clumsiness.
I had to take the plunge, however, if my productivity was to benefit from it.

![]()
How to Erase Mistakes in Your Bullet Journal
I have never been a fan of the way white-out looks on paper, I think it’s too distracting. And using squiggly lines or strikethroughs to cross out a mistake is simply out of the question for me!
That’s why I fell in love with erasable pens![]() . The concept seemed simple enough, but I had oddly never heard of them before. I wish I had.
. The concept seemed simple enough, but I had oddly never heard of them before. I wish I had.
They instantly solved my problems and helped me overcome my fear of making mistakes in my bujo.
Erasable pens![]() gave me the freedom to write at will and to experiment with different layouts because I knew that if I hated what I’d written, I could just erase everything and start anew.
gave me the freedom to write at will and to experiment with different layouts because I knew that if I hated what I’d written, I could just erase everything and start anew.

![]()
I also love that they’re affordable and have more than four thousand 4.5 star reviews on Amazon![]() . When I saw that, I knew I had to try them out for myself.
. When I saw that, I knew I had to try them out for myself.
I can say without hesitation that out of all of my bullet journal supplies (and boy do I have a ton), these are my absolute favorite. I simply cannot go without them.
Besides being erasable, they come in a variety of colors, which allows me to utilize color for both organizational AND decorative purposes.
For example, I might use a black pen in my daily spread for writing down my to-do tasks, and then use a purple pen for my gratitude log that’s on the same page.
If I want to get a little crazy, I’ll use a different color for the headings!
Or, you could create your own organizational system by color coding your tasks. You could use a red pen for your most urgent tasks, a blue pen for your second most-urgent tasks, and a green pen for tasks that you’ll complete once the more important ones have been taken care of.

![]()
If you’re wondering how the pen erases the ink, it’s actually pretty interesting. These pens aren’t like pencils- the eraser won’t wither away with each use or leave behind any residue.
Instead, when you use the “eraser” tip of the pen to erase your mistake, the friction that’s caused by that action heats up the ink and makes it disappear. Isn’t it that clever?
Your mistake will be completely gone- well, almost completely gone. You see, since heat makes the ink disappear, cold temperatures can make it reappear.
So, if you want your mistakes to reappear, just stick it in the freezer. It’s unlikely, however, that you’ll ever have to do that! This is why you’ll want to be mindful not to leave your pens in the car – it could make the ink disappear.
If this happens, just place the pen somewhere really cold. Strikingly low temperatures can make the ink from the erasable pen reappear. So while your mistake isn’t actually totally gone after you erase it, it’s gone enough that you won’t see it.
Pilot Frixion doesn’t just offer erasable pens, but erasable highlighters, too. Honestly, as someone who uses highlighters often to decorate my bullet journal and call attention to important reminders, erasable highlighters blow my mind. They make me feel like a kid in a candy store.

![]()
I love using these pens and highlighters because it’s completely gotten rid of my fear of making mistakes AND has afforded me the opportunity to be more experimental.
Since erasing mistakes in my bullet journal is now possible, I feel I can experiment with different layouts more easily without having to use a separate practice notebook like a lot of other billet journalists do. This saves me time and money. And a whole lot of frustration!
Cover Your Mistakes with Pretty Washi Tape
Washi Tape![]() isn’t just decorative, it can also help you cover up your mistakes! If you don’t use erasable pens, then putting some washi tape over your mistake is the next best thing. After all, washi tape shows up on so many bujo spreads, so no one would suspect that you didn’t actually intend to use tape on your spread!
isn’t just decorative, it can also help you cover up your mistakes! If you don’t use erasable pens, then putting some washi tape over your mistake is the next best thing. After all, washi tape shows up on so many bujo spreads, so no one would suspect that you didn’t actually intend to use tape on your spread!
This tip works in any area of your spread – your headings, your handwriting, a botched drawing, less-than-straight lines – it will work across the board and it might even end up looking better than your original spread idea!

![]()
![]() Place a Planner Sticker Over Your Mistake
Place a Planner Sticker Over Your Mistake
When all else fails, put a planner sticker![]() over your mistake! Stickers are really cool in bullet journal spreads, especially if they contain some type of inspirational word or quote. You’ll see them regularly in different layouts and spreads.
over your mistake! Stickers are really cool in bullet journal spreads, especially if they contain some type of inspirational word or quote. You’ll see them regularly in different layouts and spreads.
Try placing the sticker in a slanted position to give a “rogue” look – it’ll look like you intended to place it there! (See below!)


![]()
Use a Cut-Out Picture from a Magazine
Have you ever seen a spread that has picture cut-outs? They’re beautiful and they look SO creative. Better yet, cut-outs are an excellent way to cover up an ugly mistake in your layout. Simply pick up the nearest magazine and look for a pretty image.
Cut it out with scissors (it doesn’t have to be perfectly cut – it may look more artistic if it isn’t!) and tape or glue it on top of your mistake. That’s it! To get your spread to look more uniform, try adding a few more cutouts throughout the page. (See below!)

So there you have it, that’s my way of easily fixing mistakes in my bullet journal. You can’t prevent mistakes from happening, BUT you can fix them with the right tools. I hope this proves as helpful and liberating to you as it’s been to me!
To see the other bullet journal supplies I recommend, check out this comprehensive list. It’s chalk-full of supplies that are popular among the ever-so-talented bullet journal community. You’re bound to find something you love!
I know first-hand how exciting it can be to start a new bullet journal, so these supplies should help you make the very best of your new hobby.
For inspiration on creating unique layouts and spreads, take a look at this list of #bujo Instagram profiles – these 10 bullet journalists create some of the most beautiful spreads I’ve ever seen.
Happy journaling!